There are a variety of ways to work with digi stamps. Once you
become familiar with the tools in your Word program, the more you will be able to do with your images. In this tutorial I am using MS Word 2010.
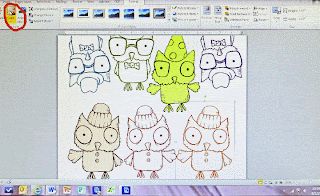
Since I like to cut out most of my images, it makes sense for me to fill a page prior to printing. You can take best advantage of your paper real estate by flipping, turning, and resizing your images. Fill up a 8.5" x 11" sheet --if you are not using all the images right away you have them on hand for quick last minute cards.
Images import in black and print in black, unless you tell your image to print otherwise. There are thousands of ink colors at your fingertips in your Word program. Match your favorite chalks, inks, Copics, Prisma, or Bic colors.
Once you have created your layout click on the image you want in a color. An icon marked "color" will be a visible tool in the top tool bar. Click on it and a pull out menu with lots of options will appear.
In this screen shot I have already selected and colored several images. Arranging images close is possible with png files. If you are using jpeg images you will have that white box fixed around the image and waste paper. Make sure your digi stamps are high resolution and a .png file.
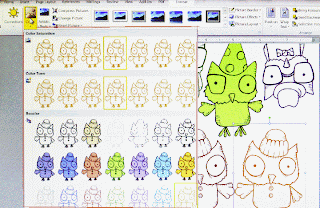
The screen shot on the left shows you the many color options in the pull-out menu. You will have a choice of tone, saturation, and color fill (which is kind of cool because the outline remains black and the image is a solid fill).
What if you want to
customize your colors and go beyond the options in view?
At the bottom of the menu you will discover there are additional tools to select color variations or customize your own colors.
I like to print on a nice white cardstock that takes media well. My preference is Strathmore 88 lb. cover Bristol in Ultimate White. It's an elegant paper and makes lovely note cards as well.
Before you print check your print settings. To get a deep crisp outline be sure to select best quality (or photo quality) as many printers have ink saving features and will default to draft print.
Any questions? Please contact me at:
janet@veralanestudio.com


